You have many options when you want to share your map with others. All maps are private by default — only you as the creator of the map can...
You have many options when you want to share your map with others. All maps are private by default — only you as the creator of the map can view or edit it. Below you’ll learn how to make the map public and embed it on your website, as well as how to collaborate on your map with colleagues.
To share a link to the map:
- Click the Share button in the map menu.
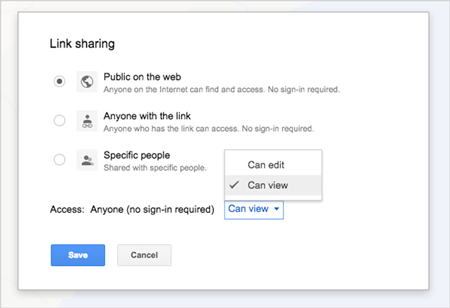
- Under "Who has access", select Change and you’ll be given options to either leave the map "Specific people" (or private), "Anyone with the link" or "Public on the web".
 If you choose to make your map Public on the web, you’ll be able to further refine your share settings to make your map either just viewable or editable by the public.
 Tip: Sharing your map with a person who has a non-Google account? Copy the map URL and change the word “edit” in the URL to “view” before sending -- then no login will be required.
Collaborate with colleagues:
- Click the Share button in the map menu.
- Under “Add people” at the bottom of the menu, type in the e-mail addresses of the people you’d like to share your map with directly, or choose from your contacts. You can select whether the people you invite can edit the map or just view it.

Tip: You can quickly add multiple collaborators to your map by sharing your map with a Google Group. Each member of group will have access to your map, and if you add new people to the group, they’ll have access too.
Embed your map:
- First, make sure your map is Public on the web. Share button > Who has access > Change > Public on the web >Save.
- Go back to your map and select the map menu pulldown, indicated by three dots next to the Share button.
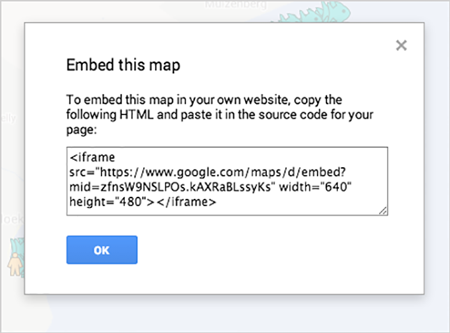
- Select Embed on my site.
- Copy the HTML and paste it into the source code of your website. Note that you can customize the height and width of your map.
 Tip: You can set a default view for the map. This gives you extra control over what portion of the map will be on display when a viewer first visits your map. To set this feature, position the map in your browser. Then go to the map menu pulldown, indicated by three dots next to the Share button, and select Set default view.
Congratulations! You have learned how to import data, customize styles and share your map using Google My Maps.
Summary1- Import your data to Google My Maps
2- Style your map on Google My Maps
3- Change the style of your base map on Google My Maps
4- Edit your map data on Google My Maps
5- Label your data on Google My Maps
6- Share and embed your map from Google My Maps
7- Search and filter your data on Google My Maps
8- Embed your map from Google My Maps


COMMENTS